
DynaVap VapCap brought the retro method of smoking herbs by combining the vape style with the cigarette technique. It is safe to say that you get the best of both the worlds when you use it. But it can be tricky for beginners, especially when you are absolutely foreign to the ways of smoking.
I have many people complaining that DynaVap is a lot of work, but they become fans in a few days. The trick is getting used to the process. Every good thing requires a little bit of hard work and why should smoking beautiful herbs and flowers be exempted from this.
You begin to enjoy the process, the leisurely drags, and start to discover different ways to produce the clouds of vapour.
This article is your ultimate guide to using DynaVap Vapcap as it will walk you through the steps, the tricks to manage the airports, the perfect lighter, and the cleaning process. Whether you're a beginner or a veteran user, keep reading cause' you might just learn something new.
What's in the box?
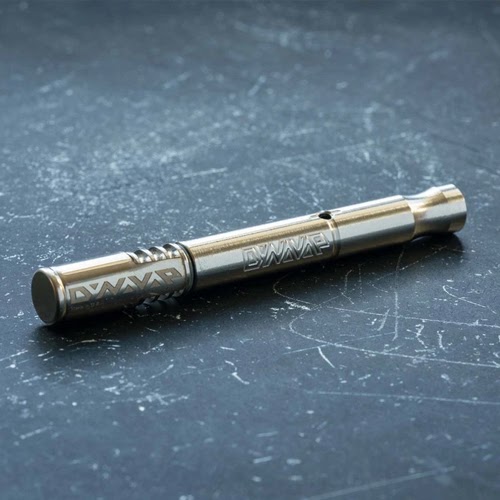
The DynaVap comes completely assembled, packed in a box, so you don't have to do all "Ikea" on it. The older editions came with a coloured plastic tube for storage, but with their latest M 2020 Edition, DynaVap introduced an environmentally friendly cardboard holder.
You can pull apart the different parts of the DynaVap VapCap for cleaning or to simply quench your curiosity but have a good idea about what goes where.
The Steps to Using DynaVap VapCap-
Step 1:
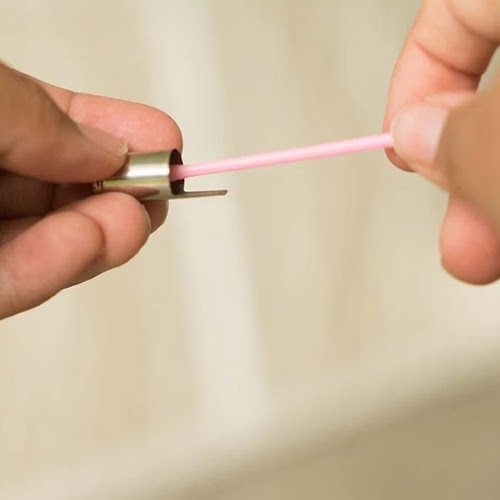
Since the DynaVap comes completely assembled, the first step is to scoop the herbs in the compartment dedicated for it. For this, you'll have to remove the cap. It is the part which has the logo and is pretty similar to the cap of a pen.
The consistency of the herb depends on the style of smoking you prefer. I use a Santa Cruz 4-part herb grinder to get the task done. You can fill the chamber up to the level of the tip and use a packing tool or a simple stick to tap on it. You don't have to worry about packing it too tightly as the vape still works, but as you use it, you will find your consistency. My suggestion would be to use different consistency and see what works the best for you and your "high" ness.
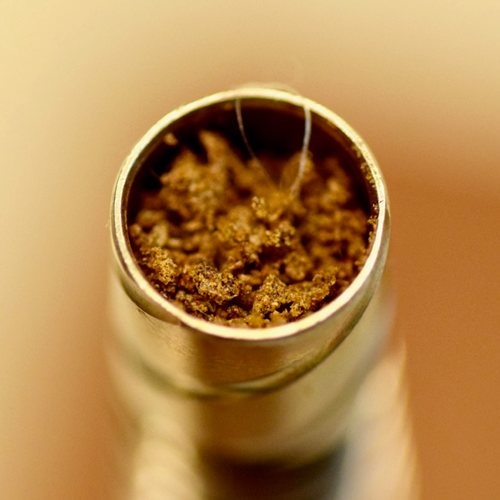
Another method to load your herbs is by putting the tip in the shredded herbs and sucking on from the mouthpiece. The vacuum allows the herb to settle down in the chamber while your hands are free from the stickiness. You have to be careful not to grind the herbs too fine for this as they may escape through the screen and end up in your mouth.
Nobody likes uninvited snacks!
Step 2:
Once your herbs are comfortably settled in the chamber, you put the cap back on and get ready to heat them.
Heating your herbs manually can be a little tricky, especially when you don't realize how the temperature affects your smoke. Let me explain that to you.
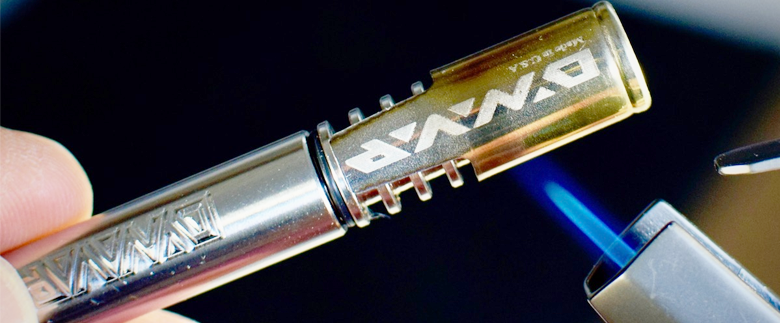
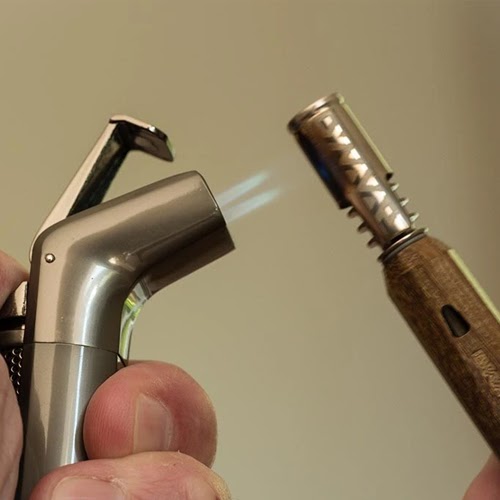
It is recommended to use a butane lighter for the process though it works well with any kind. The first step of heating is to learn how to control the temperature. Yes, you can do that!
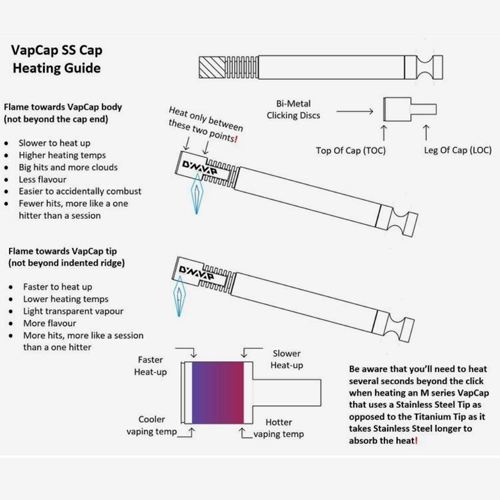
Heating near the start of the cap where the "D" of the Logo is placed is where the vape functions at a lower temperature. As you move further away from there, the temperature rises.
If you have used the portable vapes with adjustable temperature, you know your choice that helps to create those heavy clouds of smoke. But if you're a novice smoker, here's a helpful guide that will help you through.
Now, that you know where to place the flame, let's talk about another aspect that affects the heating; the flame length and positioning.
Keep the flame length to 1cm, which works best for our DynaVap VapCap. You should use the light blue halo that surrounds the dark blue part of the flame to heat it as it is the hottest part.
While heating, you should rotate your DynaVap VapCap like a roasting chicken to ensure to get all the sides and evenly heated material. Concentrating your flame on one end may burn your herbs and defeat the purpose of using a vape to smoke them.
Keep your DynaVap at 30-45 degrees and rotate it until you hear the click.
Wait, what's the click? Let me explain.
Step 3:
DynaVap asks its users to "Respect the click" and you really should.
Here's how the clicking works.
As you heat the DynaVap VapCap, it starts reaching the optimal temperature beyond which your precious herbs will burn. It is at that maximum temperature when you hear a click. That is an indication to stop heating and start toking.
You have to realize that heating it beyond the click won't do some magic or miracle. It will just give you the burnt harmful smoke, that gives a foul taste.
After the click, you may hear another click which is slightly louder which is just there to make sure you heard the first one. You can start dragging after the first one or wait till the second louder click.
Once you start with smoking, it is natural that the temperature starts to fall. When it is below the level at which you can vape, you will hear a click again, which is an indication for you to start heating the tip.
A click at the start and click at the end, this is all that you need to "Respect" and take care while smoking DynaVap VapCap.
While lighting up and toking may be your jam, it is slightly annoying while you're leisurely watching a movie or having a party. In that case, the DynaVap Apollo heater is really fancy! All you have to do is stick your vape there until it heats and then smokes the herbs. No lighter and no worry.
Step 4:
Once you hear the first click, it is time to take a drag. You can adjust the vapour with the help of the airports given on the side of the device. It is usually a small hole on the body of the DynaVap VapCap, but we saw chiral airports in their latest M 2020 Edition. Either way, it helps you adjust the resistance by covering or baring the airports.
The most popular way is to cover the airports with the index finger and rotate the device as you take a drag to cover/uncover the ports.
You can also leave it completely bared for a wide-open draw or completely covered for thick clouds and slow drags.
You can find your consistency mid-way also. The idea is to indulge in gentle pulls for constant results.
Just experiment till you get the heavenly puff and the desired vapour taste!
| Also Read: [REVIEW] We Used the DynaVap M 2020 & Here is What We Think |
Step 5:
You get the process of toking with DynaVap- you heat, you smoke, you reheat, and repeat.
Once you hear the click after taking a drag, you know that it is time to reheat the substance. And when you're done with your session, you can simply let it cool and then scoop out the material.
You can get a magnetic holder that will help to keep the DynaVap in place till it cools down enough to be handled by bare hands. Or you can get the DynaStash which also has a magnetic holder along with storage space for your device.
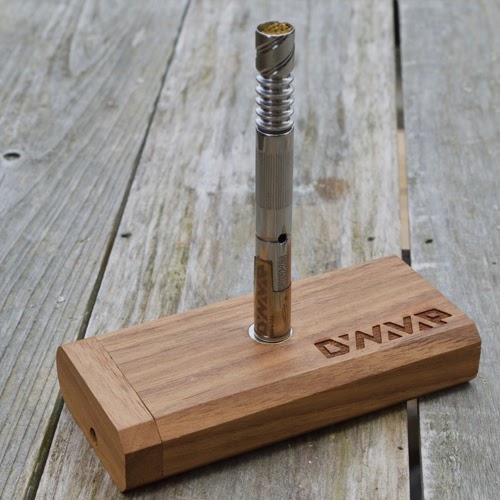
Once your device is cooled down, use the extended part of the cap to scoop out the material. Don't store it with the used material as it may clog your screens and give a foul taste.
If you are a regular user of the DynaVap, make sure you clean it to avoid deep cleaning sessions. Though the screens are changeable and the body is almost indestructible, you have to indulge in a little bit of maintenance to keep it working as smoothly as possible. Wait for the DynaVap to cool down before you empty the chambers to avoid burning your hands.
There you go! You know how to smoke DynaVape, go ahead and give it a try.
Picking the perfect lighter
Butane torches work best to heat the DynaVap with their five-seven seconds heating time and precision flame. You can use your regular soft flame lighter, but it may take a longer time to heat the material and leave soot marks on the tips. Torches with more flames are a general choice as they heat the DynaVap quickly but sadly do not provide precise temperature control.
Most of the lighters are cheap, and you can get one without bearing them heavily on the pocket.
Cleaning & Maintenance
Along with its sturdiness and portability, one of the most attractive features of DynaVap is the ease of maintenance and cleaning.
Start with disassembling the DynaVap by pulling them apart along with some twisting. Your DynaVap is divided into three parts- the metal pieces, the rings, and the body.
Though many people use isopropyl alcohol to soak the metal pieces, I would not recommend using it. It clearly states to avoid using chemicals on the DynaVap official website. You can use a dishwasher or any mild washing liquid to soak the rings and metal pieces. As for the stubborn and difficult areas, you can use a Q-tip to clean it.
After washing them, leave them out to dry completely before reassembling the device together.
FAQs
How often do I clean my DynaVap?
It all depends on your usage. If you're a very mild user, it might work up to 10 days. With very heavy usage, you can use it for 4-5 days without cleaning. Most people wait until they can feel the reclaim in their mouth when they pull as an indication to clean the vape.
Does VapCap smell?
It is known to be a discreet way to smoke, but as far as the smell is concerned, it depends on the strain of the herb that you're smoking. DynaVap, in itself, does not curb the smell.
How many hits can you get from the DynaVap?
You can give 1-2 thick flavoursome clouds of smoke before you have to reheat it.
At what temperature does the DynaVap click?
The general temp at which the DynaVap clicks is 300-340 degrees Fahrenheit.
Here we come to the end of the DynaVap VapCap Guide.
Now you know how to use it, clean it, the most efficient way to heat it, and which lighter works best. You can go ahead and get your DynaVap if you don't already have one, or simply take it out from your collection and toke it.
Are doubts still bubbling at the back of your mind? Comment below and I will get back to you.
![[Updated] Vape Pen 101 - What is a Vape Pen & How to use it?](https://www.olivastu.com/media/magefan_blog/Banner_35.jpg)
![[REVIEW] We Used the DynaVap M 2020 & Here is What We Think](https://www.olivastu.com/media/magefan_blog/Featured-dynavap.png)
![[Review] G-Pen Elite Dry Herb Vaporizer - Is it Worth the Hype?](https://www.olivastu.com/media/magefan_blog/Featured20.jpg)