
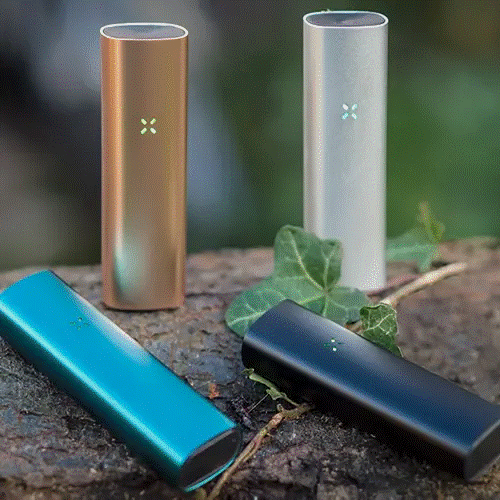
The Pax 3, a third-generation vape from the producers of the most portable vaporizers, is quite a sight to behold. It holds a futuristic technology, sleek design, and simplicity for anyone trying to navigate and get the best of the device. Let's see a bit about what Pax 3 is?
The Pax 3 includes a quicker heating element, use with concentrate, and a Bluetooth application that allows a customized experience. It's a more advanced version of its predecessor, Pax 2, which was hailed and loved by the public.
For anyone new to this exquisite device, here's a detailed step-by-step guide on how to use the Pax 3. It's not rocket science, but it is essential to know how to navigate through its simple user interface. We will also discuss some tips to maintain and some tricks to get the most out of the device. Let's get started!
What does the Pax 3 box contain?
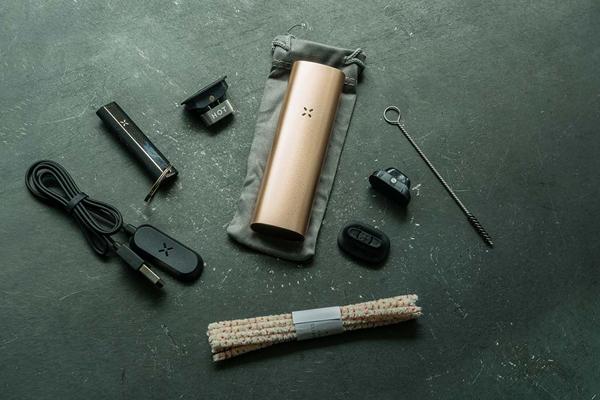
The Pax 3 vaporizer comes equipped with the following accessories:
- Pax 3 Vaporizer
- Charger
- Mouthpiece (Flat & Raised)
- Standard Oven Lid
- Cleaning Kit
- 10 Year Warranty
If you buy the Pax 3 Vapourizer full Kit, it contains the following (in addition to the ones mentioned above):
- Half-Pack Oven Lid
- Concentrate Inserts
- Carrying Pouch
- Extra Screens
- Multi-Tool
We know the accessories to expect with the device, let's move further.
Charging the Pax 3
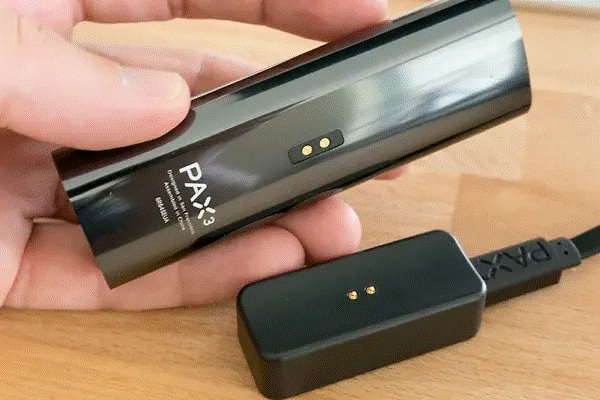
The rule of thumb before starting any device is to charge it up. And Pax 3 follows the same rule. Before you plan to rip from the uber-cool vape, make sure you plug it in and let it completely charge. If you're wondering how to charge the Pax 3, let me make it easier for you.
Plug the charger into any USB port or an adapter that you can connect to the socket. Place the Pax 3 on top of the charge, ensuring that the lights are facing up. The magnets will make way for the device to be placed securely, and once done, the charging will commence. You can track the charging by noticing the number of petals that illuminate. Once the charging is complete, all four of the petals will be lit.
It takes around three hours for the device to reach a full charge for the first time. For subsequent times, it takes around 2 hours.
| Also Read: [Review] Pax 3 Vaporizer - Price, Specification, & Performance |
How to turn on the Pax 3?
The first step is to switch the Pax 3 Vaporizer on and get started with the process.
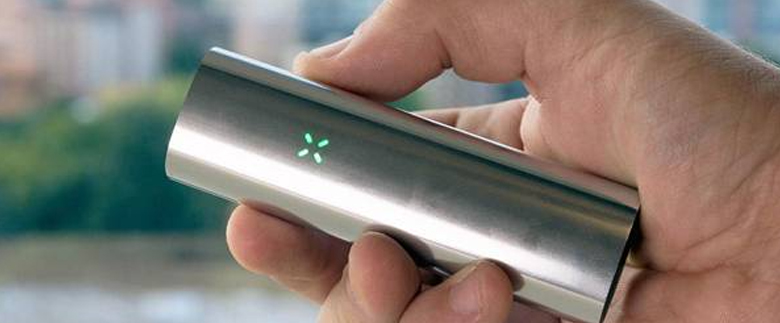
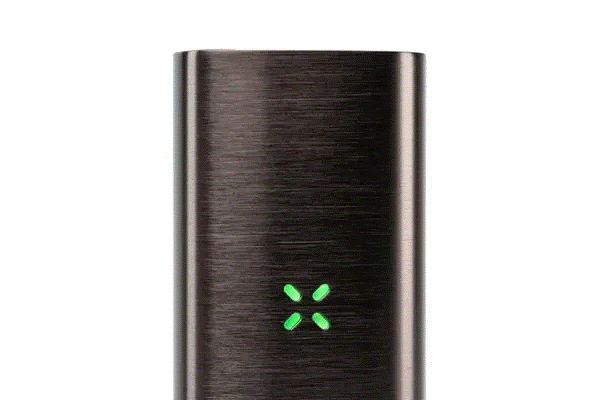
It's pretty simple to turn the device on; you simply need to press the button placed on the centre of the mouthpiece. This starts the heating process, and the same is indicated with the help of lit petals that turn violet. When the required temperature is reached, the petals turn green. The entire process takes less than 30 seconds.
Temperature Change - How to use the Pax 3?
Once you know how to switch on the device, it's time to take a look at customizing the temperature.
To do so, you need to hold down the button on the mouthpiece for a few seconds and leave when you see the petals flashing. The petals will display the current temperature setting through their light, and once you find the ideal one, simply hold the button or shake the vape to lock it. The mouthpiece button will help you cycle through the various temperatures. Here are the following temperature settings:
- Temperature Setting #1 - 360ºF (182ºC)
- Temperature Setting #2 - 380°F (193°C)
- Temperature setting #3 - 400°F (204°C)
- Temperature setting #4 - 420ºF (216ºC)
Burnoff - An essential step
Before learning how to use the Pax 3, it is very crucial to indulge in a burnoff session. A burnoff cycle ensures that any residue or leftover from the manufacturing or shipping process is cleaned, allowing you to taste the pure flavour of the herb.
To do so, turn on the vape as mentioned earlier, and choose the highest temperature. Make sure that the oven is empty at this stage.
Let it burn for around 5 minutes or until the unwanted smells disperse. Do another round if you feel that the last one was not enough to clean the oven.
| Also Read: [Updated] Storz & Bickel - Volcano Hybrid Vaporizer Review |
Step-by-step Guide on How to Use the Pax 3
Step 1: Grind it Fine
The Pax 3 offers the best performance when the herb is finely shredded. Make sure you use a sharp-bladed grinder that cuts through the nugs to turn into the most fluffy consistency.
Step 2: It's time to pack it!
Once the herb is shredded, it's time to pack the oven. To expose the oven, press on one side of the oven which lifts the other edge. Remove the lid to access the oven.
It is known that the Pax 3 works best with a tightly packed oven. Make sure to use a funnel and a packing tool to collect the herbs and level them in the oven. Moreover, you can also use the half-pack lid for smaller sessions, if you're not too keen to use so much in a single session.
Step 3: Temperature Setting
Switch on the device by pressing the button on to, and hold it for a few seconds until you see the petal lights flashing. You can cycle through the setting using the same button until you reach the desired one. Once achieved, you can hold the button to set the temperature.
If you're reaching the end of the bowl, heighten the temperature to the last setting, as it can help clean the bowl. Moreover, Pax 3 offers conductive heating, which means you don't have to stir mid-session for a smooth vaping experience.
To get the best from the Pax 3, use short, light draws. Place your lips at the edge of the device or on the side, and inhale slowly with short draws. It leads to thicker hits when you vape for 10-15 seconds between each draw, allowing the heat to come back up in the oven.
Step 4: Finishing and cleaning the Pax 3
Switch off the device after your session by holding the mouthpiece button. Even if you do not turn the vape off, its automatic shut-down feature will do so after 3 minutes of not being in use. Once you're done empty the oven. If you're wondering how to clean the Pax 3 Oven, you can simply do one step.
After the device has cooled down, brush out the oven and the underside of the lid. That's it. You will notice that the oven's colour has changed after a few sessions. Don't worry, it's normal, and it usually does not go back to the original look.
We also get how often to clean the Pax 3 - I would suggest cleaning the oven after every use. As for intensive deep cleaning, it depends on your usage.
This brings us to the end of our article on how to use the Pax 3. If you're wondering if the little device is worth it, I would say Yes. The Pax 3 offers an immersive experience, smart technology, and a very simple user experience, perfect for anyone looking to accentuate their vaping game.
Make sure you keep following this space for more such content!
![[REVIEW] Pax 2 Vaporizer: How to Use & Clean Your Pax 2?](https://www.olivastu.com/media/magefan_blog/Pax_Vapour.jpg)
![[Review] Pax 3 Vaporizer - Price, Specification, & Performance](https://www.olivastu.com/media/magefan_blog/feature_110.jpg)