
Rolling a joint used to be the OG way of smoking the dank herbs. The art of crafting a doobie was hailed among the stoners, and green thumbs were a matter of pride. But as we progressed towards newer methods of consumption, the process has changed a bit. From the world of hand-crafted glass bongs to digital vaporizers, we have surely made quite a few interesting advancements. And the amazement doesn't seem to die down!
In this article, we will be discussing one of the most potent ways to smoke green herbs. And this involves gravity!
As stoners find every possible way to enjoy cannabis, the bustling creativity and inventive nature comes forward. The gravity bong has stood the test of time to become the top DIY weed apparatus. The ultimate smoking device has been here for a long time, and has even undergone an evolution in recent years. From cheap plastic bottle make-do to a complete glass look, gravity bong is not your average accessory. Let's take an in-depth look into the device.
What is a Gravity Bong?
A gravity bong, also known as geeb or bucket bong, uses gravity and two containers to push the smoke directly into your lungs. The hit is stronger, and the overall effect is more potent as water displacement and gravity work together to pack a punch.
Born from necessity and lack of head shops in previous days, gravity bongs were a staple of college dorm parties. The household items can create a plethora of pipes, the gravity bong is really an icon! The cannabis consumption method creates a funnel of smoke through water to push into the consumer's lungs.
How does a Gravity Bong work?
Gravity Bongs uses a two-piece chamber system that brings together,
one keeps the water, and the other one handles the bowl and captures the smoke.
There are two types of gravity bongs - the bucket bong with two vessels and the other one with the reverse bucket bong with only one vessel. Here's how a gravity bong works.
As you light the bowl attached to the smaller container, raise it slightly out of the water. It is done to create a vacuum that will engulf the smoke from the bowl into the next chamber. The gravity works to provide the needed push to the smoke, and as it travels to the other chamber, it is ready to be inhaled by the consumer.
Since the two chambers work to force the smoke into the lung, the hit is stronger than regular ones.
Also Read: [Review] Stündenglass Glass Gravity Bong/Hookah - Worth it or not?
Does a Gravity Bong make you higher?
The short answer is YES! You had a preview of how a gravity bong works in the previous section. The fact that it pulls concentrated smoke directly into the lungs, which is much higher than the average hit, ensures the high is also better. It's almost as if you are smoking an entire bowl in a single puff. Now that's something!
A word of caution before you move forward - Gravity Bong is not for the faint-hearted. It smacks with a power punch of THC that knocks your senses off. Novice smokers and beginners should not opt for this. However, for a true seasoned cannabis user, this might just be a worthy experience. Efficiency is the key here, and the quick high and strong hit is appreciated by the ones looking to engulf in the potency of the green herbs.
If you're looking to get your hands dirty in a DIY project, take a look at how to make a Gravity Bong!
How to Make a Gravity Bong?
Before we move forward with the step by step process to make a gravity bong, let's put out a word of concern. Many people use plastic bottles to make gravity bongs. These are single-use plastic that releases chemicals when heated, which can find their way to the smoke when inhaled. Be aware of the consequences before indulging in the OG way of smoking out of a bong.
What do you need to make a gravity bong?
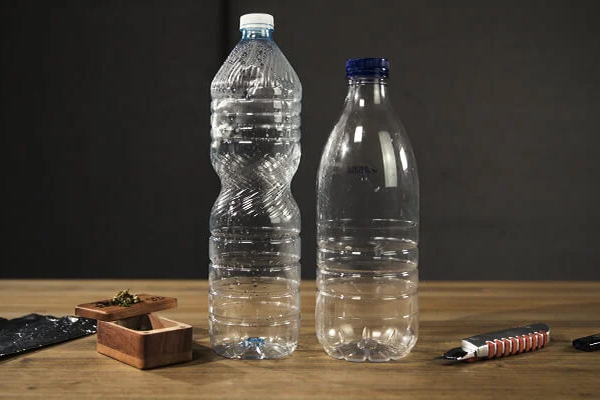
- Plastic Bottle
- A slightly bigger plastic bottle
- Sharp Knife
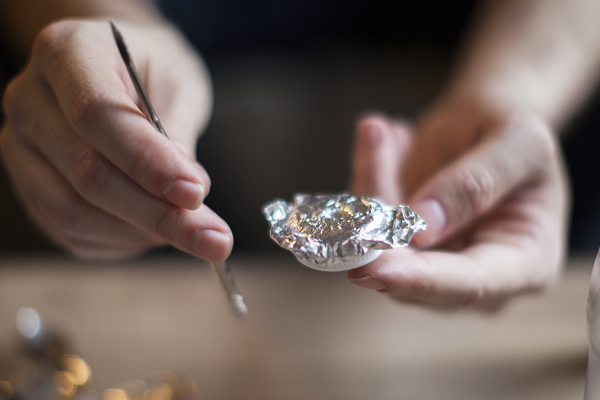
- Aluminium Foil
- A Sharp Device for Poking Holes
- Dank Green Herbs
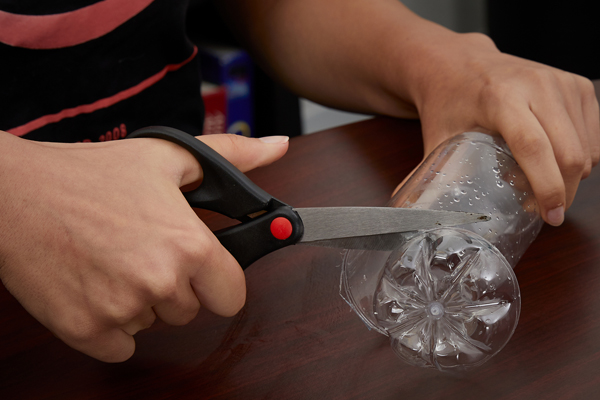
Step 1: Cut in the Bottle
The first step involves making a bowl attached to the smaller of the two bottles. Take the smaller plastic bottle and cut off the bottom, almost half of the bottle. But make sure that you do not trim too much off the bottle as it will influence the hit.
The second bottle, which is the bigger one, also needs a cut. But the difference is that you need to cut the bottom of the bottle.
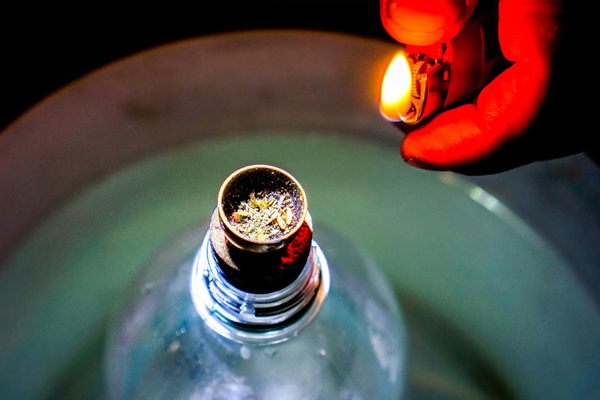
Step 2: Make a Hole
Unscrew the bottle cap of the smaller bottle. Use aluminium foil to cover the cap. You can carve a deep bowl according to your need. Once done, use a pin or a sharp object to poke holes in the foil. Be very careful as you can rip out the entire foil. Ensure you make a sturdy bowl so your precious herbs do not fall into the water.
Step 3: Water Time!
Fill the bigger bottle with water. It will act as the water filtration part of the process and ensure you get clean smoke.
Step 4: Top the Bowl
The aluminium bowl that we made needs some topping. Grind some herbs and sprinkle on the bowl to ensure even burn. Screw the cap back on the bottle.
Step 5: Submerging Time
Here's the tricky part where you need to be careful. Submerge the smaller bottle into the bigger bottle which is filled with water. You don't have to drown the bottle. Make sure the bowl is well above the water.
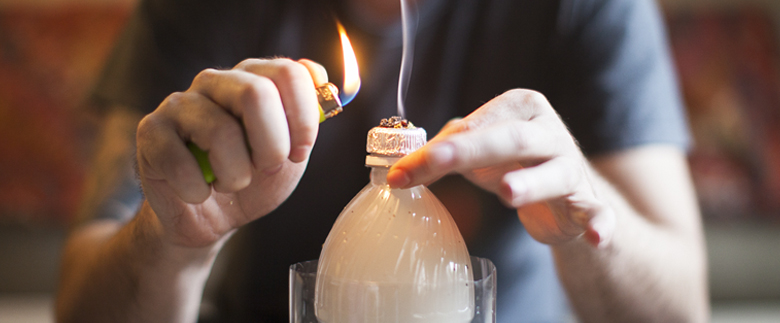
Step 6: Light it up!
It's time to light the herb!
Use a lighter to ignite the bowl and slowly pull the bottle upward from the water. You would see the bottle fills with smoke. If not, make sure your bottle cap is screwed on securely.
Step 7: Unscrew the Cap
As the smoke fills the bottle, unscrew the cap and place your mouth on the opening.
Step 8: Push the Bottle
Slowly push the bottle into the water. As the water enters the bottle, the pressure pushes the smoke into your lungs. It can send the most seasoned cannabis enthusiasts into a fit of cough, so ensure you are being cautious.
Now that you have understood how to use a gravity bong, I am sure the process seems much simpler. I hope this was informative and interesting. Feel free to comment below if you have any issues!
![[Updated] Old-School Bong: How to Make A Water Bottle Bong?](https://www.olivastu.com/media/magefan_blog/bottle-featured.jpg)
